ANDROID
testId{
font-weight: bold !important;}
Read all the blue sections to better understand the documentation and the orange sections signifying the alert so avoid mistakes to be made during integrations and detailed integration procedures.
GENERATE YOUR API KEYS
API keys are your digital references towards PayDunya systems. We use them to identify your account and the applications you will create. These keys are necessary for any integration of the APIs of PayDunya's payments APIs. Here are the steps to follow:
-
First you need have a PayDunya Business account activated. Create one if it is not yet the case.
-
Login to your account and click on Integration API at the menu level on the left.
-
Click on the button Set up a new application and fill out the form.
-
Choose
Test mode, I want to make payment testsandEnable production mode.
INSTALLATION
Click on paydunya_java_latest.jar to download the latest version of our JAVA package and its dependencies. Then add paydunya_java_latest.jar to your CLASSPATH using the following instructions:
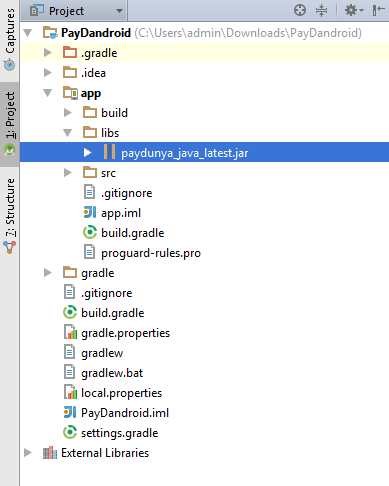
In your IDE (Android Studio), click
Projectin the menu on the left and then display your application as a project by selectingProjectfrom the drop-down menu of the window that 'is posted;Look for the
libsfolder that is theappfolder. Copy the previously downloadedpaydunya_java_latest.jarfile and paste it inside thelibsfolder;Then right-click
paydunya_java_latest.jarand clickAdd as Libraryto add the PayDunya plugin to the list of libraries.
Finally, import all the classes of the com.paydunya.neptune package into the file (s) where you want to use the PayDunya library:
import com.paydunya.neptune.*;
BASIC CONFIGURATION
API configuration
Login to your PayDunya account, click on Integration API then details at the application level that you have created, retrieve the API keys and give them as arguments to the following methods
PaydunyaSetup setup = new PaydunyaSetup();
setup.setMasterKey("wQzk9ZwR-Qq9m-0hD0-zpud-je5coGC3FHKW");
setup.setPrivateKey("test_private_rMIdJM3PLLhLjyArx9tF3VURAF5");
setup.setPublicKey("test_public_kb9Wo0Qpn8vNWMvMZOwwpvuTUja");
setup.setToken("IivOiOxGJuWhc5znlIiK");
setup.setMode("test"); // Optional. Use this option for test payments.
Info
If you are in test mode, use the test keys otherwise use the production keys and specify the mode by replacing "test" with "live" in the code above.
For more details on the transition to production click here.
1 - Configuring your service/activity/company information
You can configure your service / activity / company information as shown below. PayDunya uses these settings to configure the information that will appear on the checkout page, invoices, printed receipts, and PDF downloads.
Info
For the configuration of your service/company information, only the name is required , all other information is optional.
//Configuring your service/company information
PaydunyaCheckoutStore store = new PaydunyaCheckoutStore();
store.setName("Sandra's Store"); // Only the name is required
store.setTagline("Elegance has no price");
store.setPhoneNumber("336530583");
store.setPostalAddress("Dakar Plateau - Establishment kheweul");
store.setWebsiteUrl("http://www.chez-sandra.sn");
store.setLogoUrl("http://www.chez-sandra.sn/logo.png");
APIs
SERVICE PER
1 - Adding payment information
1-1 - Adding articles and invoice description:
It is important to know that billing items are primarily used for presentation purposes on the payment page. PayDunya will not use any of the amounts declared to bill the customer. To do this, you must explicitly use the method setTotalAmount of API to specify the exact amount to be billed to the customer.
/* Adding items to your bill is very basic.
The expected parameters are product name, quantity, unit price,
the total price and an optional description. */
invoice.addItem("DELL keyboard", 2, 3000, 6000);
invoice.addItem("Lenovo L440 computer", 1, 400000, 400000, "Optional description");
invoice.addItem("Logitech helmet", 1, 8000, 8000);
/* Optionally you can define a general invoice description which will be used in cases where you need to include additional information to your bill.*/
invoice.setDescription("Optional description");
1-2 - Configuration of the total amount of the invoice:
PayDunya expects you to specify the total amount of the customer's bill. This will be the amount that will be billed to your client. We consider that you have already done all calculations at your server before setting this amount.
Important
PayDunya will not perform calculations on its servers. The total amount of the invoice set from your server will be the one that PayDunya will use to bill your customer.
invoice.setTotalAmount(414000);Payment And Redistribution (PER)
This option is very interesting if you want to create your own payment solution over PayDunya or if you have to pay a certain percentage for each sale (in the case of a marketplace for example). The money is redistributed on the various PayDunya accounts of the recipients and the service is not invoiced.
You can transfer funds to other PayDunya customer accounts from your account via the Payment and Redistribution (PER) API. For security reasons, you must explicitly enable the Payment and Redistribution (PER) option in your integration / application configuration by going to your PayDunya account. You can always enable or disable the Payment and Redistribution (PER) service by updating the configuration of your integration / application by going to your PayDunya account.
Important
It is necessary to execute the PSR billing request in background.
//It is necessary to execute the request PER Payment and Redistribution in background
import android.os.AsyncTask;
private class MyTask extends AsyncTask {

private Exception exception;

@Override
protected Void doInBackground(String... params){

String email_ou_numero_du_client_paydunya = params[0];
Double montant_a_transferer = Double.valueOf(params[1]);
try {

    PaydunyaDirectPay direct_pay = new PaydunyaDirectPay(setup);
    if(direct_pay.creditAccount(email_ou_numero_du_client_paydunya, montant_a_transferer)){
    System.out.println("Statut: " + direct_pay.getStatus());
    System.out.println("Description: " + direct_pay.getDescription());
    System.out.println("ID de la Transaction: " + direct_pay.getTransactionId());
    }else{
    System.out.println("Réponse: " + direct_pay.getResponseText());
    }

} catch(Exception e){
    e.printStackTrace();
    this.exception = e;
}
return null;

}

@Override
protected void onPostExecute(Void result) {
// TODO: check this.exception
// TODO: do something with the feed
super.onPostExecute(result);
}

}
To execute the previous code in background, add the following line to the protected void onCreate method:
new MyTask().execute("EMAIL_OU_NUMERO_MOBILE_DU_CLIENT_PAYDUNYA", "MONTANT_A_TRANSFERER");